Setup openVPN client on Linux and Windows systems

In this article we will install Openvpn client on Linux systems (RPM Family “Redhat 7/CentOS 7/Scientific Linux 7”, and Debian Family “Debian 8 “jessie”/Ubuntu 14.04, and higher”), and Windows systems (Windows 7/8).
In our previous articles, we installed the openvpn server on Linux systems (RPM Family “Redhat 7/CentOS 7/Scientific Linux 7”, and Debian Family “Debian 8 “jessie”/Ubuntu 14.04, and higher), you can find the two installation articles here: Install openvpn server on Centos 7 Linux system And Install openvpn server on Debian 8 Linux system
Now we are going to install the openvpn client on different OSes, and will connect to our vpn server, So, Let’s start.
Requirements:
- Linux machine with root access “either RPM Linux or Debian Linux”.
- Windows machine with administrative privilege.
Part 1: Installing OpenVPN Client on Linux systems
Step 1: Installing the required Linux packages
- On RPM Linux Family “Redhat 7/CentOS 7/Scientific Linux 7”
OpenVpn isn’t available in the default repositories. So we need to install Enterprise Linux (EPEL) repository. Run the following commands as a root to install the required repositories and OpenVPN server/client.
# yum -y install epel-release.noarch
# yum -y install openvpn
- On Debian Linux Family “Debian 8 “jessie”/Ubuntu 14.04, and higher”
We will install the same package as above, but using apt-get instead of yum. Run the following commands as a root to install the OpenVPN server/client.
# apt-get -y update
# apt-get -y install openvpn
Here’s we installed the openVPN server, we will use it as a client to connect to our openvpn server. All we need is the client configurations files generated by the server, we need four files “ca.crt, client.crt, client.key, and All_Clients.ovpn”. You can find how to generate those files in our openvpn server installation articles using the above two links.
Hints:
1. In the openvpn server installations articles, All_Clients.ovpn is called client.ovpn
2. I'm naming it here All_Clients.ovpn not client.ovpn
3. This naming is optional, you can name it as you want.
Step 2: connecting to the openvpn server
Now, we are ready to connect to the openvpn server, So on both Linux families run the following command as a root user:
# openvpn --config All_Clients.ovpn
The output of the above command should be something like the below image:
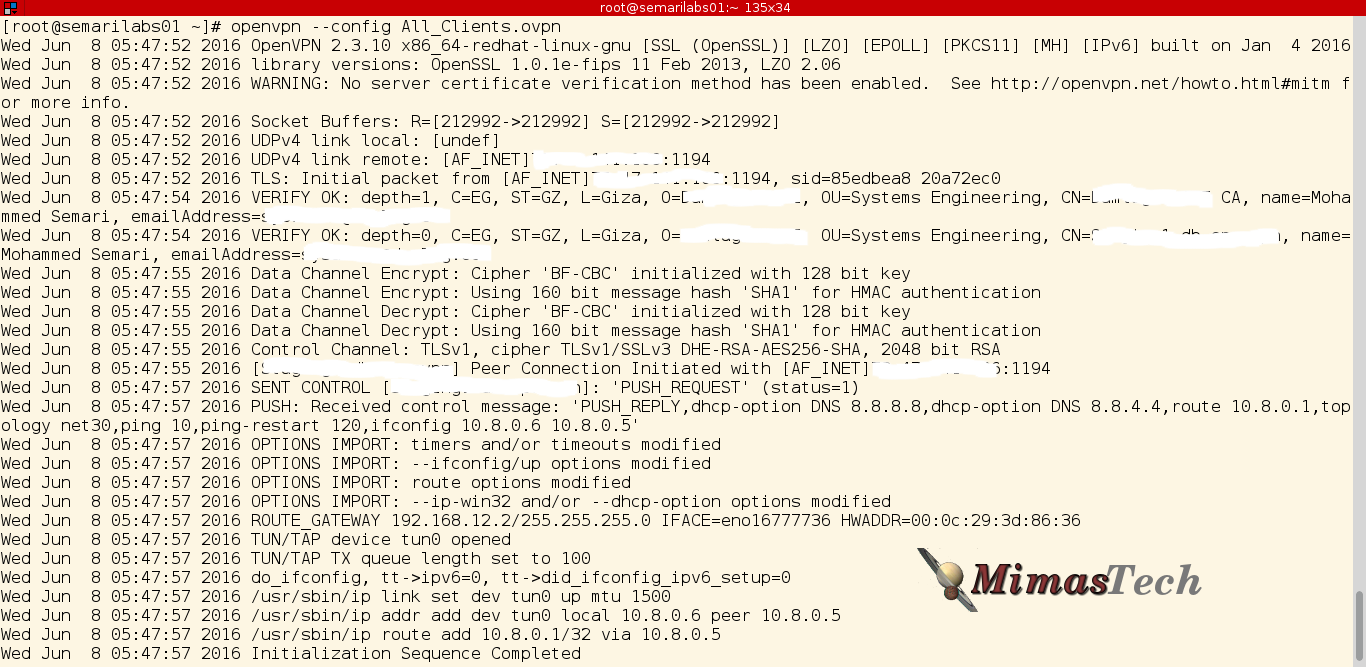 From this image, we are successfully connected to the openvpn server, but as usual we need to do some checks. We will run two checks:
Check 1: IFCONFIG CHECK
As a root Run the following command:
# ifconfig
You will find a new installed NIC interface with name “tun0” and configured to use this IP address “10.8.0.6”, as the below image:
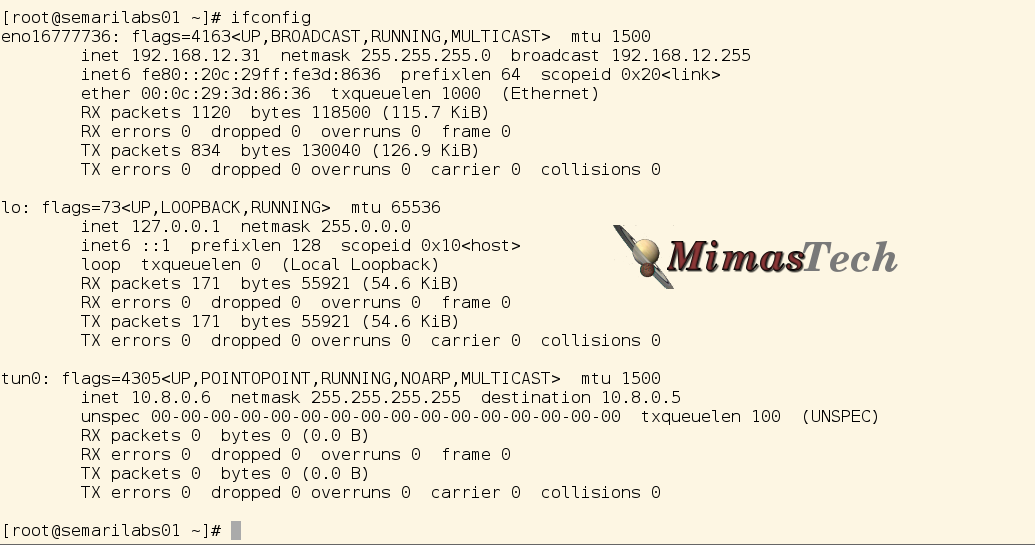
Hint:
1. You may find a different IP address assigned to your client machine.
Check 2: PING CHECK
Now, we will run the second check “ping check”, Run the following command to ping your openvpn server “it has this IP address 10.8.0.1”:
# ping -c 5 10.8.0.1
The openvpn server is replying to our ping command, as illustrated below:
 From the above tests, the connection to the remote OpenVPN server has been successfully established, our client has now an IP address, and can ping the remote OpenVPN server. We now are in the same LAN network.
Part 2: Installing OpenVPN Client on Windows systems
Step 1: Download and Install the OpenVPN Desktop Client
Click here to download the OpenVPN Connect Client or you can download it from openvpn.net. After downloading proceed with installing it.
Step 2: Download OpenVPN Config File
All we need is the client configurations files generated by the server, we need four files “ca.crt, client.crt, client.key, and All_Clients-1.ovpn”. You can find how to generate those files in our openvpn server installation articles using the two links in the beginning of this article.
Hints:
1. In the openvpn server installations articles, All_Clients-1.ovpn is called client.ovpn
2. I'm naming it here All_Clients-1.ovpn not client.ovpn
3. This naming is optional, you can name it as you want.
Step 3: Add OpenVPN Configuration File to the OpenVPN Desktop Client
Run the OpenVPN Client from your Windows start menu. Click on the ‘+’ button to add a new Connection Profile.

Choose “Local File” and click “Import”

Locate your OpenVPN configuration file and Open it.

Enter a name for the VPN Profile, or leave it as is and click ‘Save’ to add the Profile.

Step 4: Connect to All_Clients-1
Click on the newly created Connection Profile to make a connection to the VPN server.

Upon successful connection, you will have a window like below.

From this image, we are successfully connected to the openvpn server, but as usual we need to do some checks. We will run one check:
Check 1: PING CHECK
Search for the cmd in the start menu and Open it, then Run the following command to ping your openvpn server “it has this IP address 10.8.0.1”:
# ping -n 5 10.8.0.1
The openvpn server is replying to our ping command, as illustrated below:

From the above image, the connection to the remote OpenVPN server has been successfully established, our client has now an IP address, and can ping the remote OpenVPN server.
Summary
In this article we have explained the installation, and configuration of the OpenVPN client on a Linux systems, and a Windows systems. Also we included a link to download the openvpn client for Windows systems “as this client not easily found on the openvpn website”. We also do some checks to make sure that our connections to openvpn server are successfully established.
I hope this article is good enough for you.
See you in other articles.

If You Appreciate What We Do Here On Mimastech, You Should Consider:
- Stay Connected to: Facebook | Twitter | Google+
- Support us via PayPal Donation
- Subscribe to our email newsletters.
- Tell other sysadmins / friends about Us - Share and Like our posts and services
We are thankful for your never ending support.


How Do I connect openvpn cliecnt during boot on Scientific Linux?
I make a file called :
# vpn.sh
openvpn –config /tmp/pif.ovpn
First, Why you are putting the pif.ovpn in /tmp?
You should put it in any other path but not /tmp.
Also, pay attention to the paths of the certificate and keys files in this file.
You can put the ” /sbin/openvpn –config /tmp/pif.ovpn ” in this file ” /etc/rc.local “.
Now at boot time the openvpn client will start work
Regards