How to Create your First Docker Container
In this article, I’ll show you in two steps how to create your first Docker container, we’ll start with pulling an image from Docker Hub “step 1” then we’ll create our Docker container using many options “step 2.
Docker is probably one of the easiest environments to create a visualized instance based on a number of flavors of operating systems. Instead of installing an operating system by yourself, you can download one of the many guests templates or ‘images’ available directly from the Docker community “Docker Hub”. So, Let’s start
Prerequisites
Before we dive into Docker containers, we need to install the Docker daemon first. According to your Linux OS here’s our installation articles for different Linux releases:
- For CentOS 7 Linux systems, you can install Docker on CentOS 7 using this URL:
How to Install Docker on CentOS 7 Linux systems
- For Debian 8 Linux systems, you can install Docker on Debian 8 using this URL:
How to Install Docker on Debian 8 “Jessie” Linux systems
- For Ubuntu 16.04 and 14.04 Linux systems, you can install Docker on Ubuntu using this URL:
How to Install Docker on Ubuntu 16.04 “Xenial” and Ubuntu 14.04 “Trusty” Linux systems
Now, you successfully installed Docker on your Linux machine, let’s continue with the first step.
Step 1: Searching and Pulling images from Docker Hub
In order to start and run a Docker container, first an image must be downloaded from Docker Hub on your host. This part will deal with pulling images from Docker Hub to your host. Docker Hub offers a great deal of free images from its repositories.
Before pulling images, you need to search for a Docker image on Docker hub, CentOS for example, run the following command:
$ docker search centosHere’s the results of the above command:
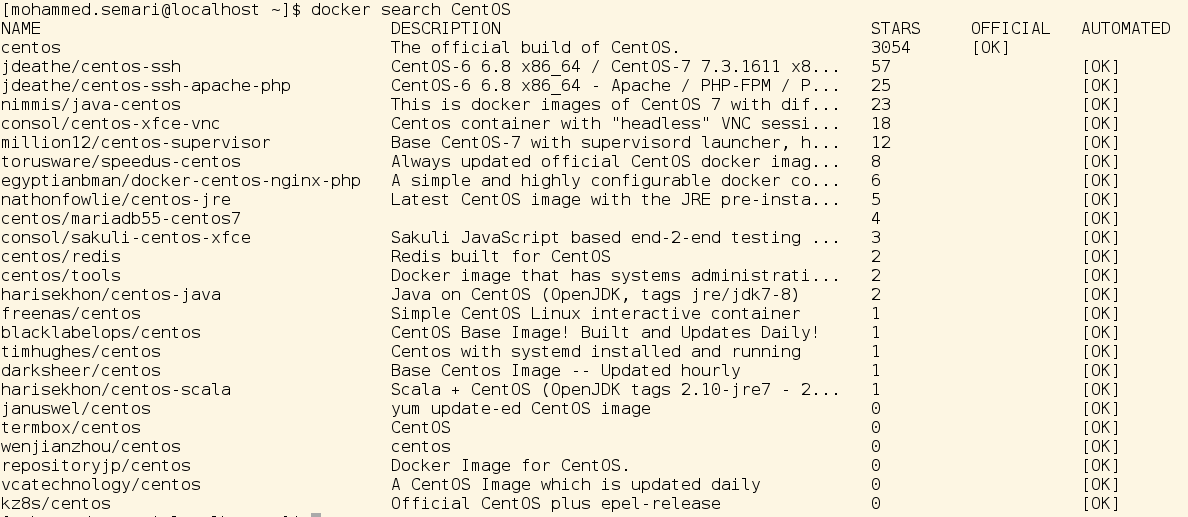
As you see, the first one is the official one, the others are users repositories. Docker search only shows public repositories. Always use official repositories.
Now, we’ll pull CentOS image from Docker Hub, pulling is a process of downloading and saving image locally,run the following command:
# docker pull centos

As you see, we are pulling centos image with tag latest, this because we didn’t specify a tag when we pulled the centos image. Let’s check the next step
Step 2: Creating Your First Docker Container
Locally pulled images are used to create a containers from it, we can create a container from an image using “docker run” command. When you execute a command against an image using docker run, you basically obtain a container. After the command that is executing into container ends, the container stops (you get a non-running or exited container). If you run another command into the same image again a new container is created and so on.
Here’s the syntax and some options used with “docker run”
# docker run [OPTIONS] IMAGE [COMMAND] [ARG...]docker run command will check on the image it uses to create a container from it locally if found it’ll create a container from is, if not found it’ll pull the image locally first then create a container.
Options:
Here’s the most used options you’ll use with docker run command
| Option | Effect |
-d, --detach |
Run container in background and print container ID |
-e, --env value |
Set environment variables (default []) |
-i, --interactive |
Keep STDIN open even if not attached |
--name string |
Assign a name to the container |
-p, --publish value |
Publish a container’s port(s) to the host (default []) |
-t, --tty |
Allocate a pseudo-TTY |
-v, --volume value |
Bind mount a volume (default []) |
Now, let’s go and create some containers using some of the above options.
Container 1: The easiest way to create a container from an image is by running “docker run <image>” command, Here I’ll create image from CentOS image without running any command against this image. The below example will check on the image CentOS locally if found it’ll create a container from is, if not found it’ll pull the image locally first then create a container then stop, as in the following example:
$ docker run centosContainer 2: The below example will check on the image centos locally if found it’ll create a container from is, if not found it’ll pull the image locally first then create a container. once this container ran it’ll print “Hello MSemari, This is the first unnamed container” on the terminal then stop, as in the following example:
# docker run centos:latest echo "Hello MSemari, This is the first unnamed container"
The container created and printed the message the stopped, here’s the output

Container 3: The container create here uses four options from the above options, first option to interactively connect into a container shell session, and run commands as you do on any other Linux session, second option to enable tty terminal, third option to run the container in the background, and fourth option to give a name to the created container to use instead of the container_ID, this will simplify your work when dealing with containers in the next part, check following example:
# docker run -it -d --name mimastech debian /bin/bash1bccad2191fa353ae4509157fecc7261005540a80ed3a743346edd4a94738d2f
Here’s our container “mimastech” still running on the background, it’s main process is /bin/bash
Container 4: The below example, shows the creation of one of my containers which I use in staging systems. Here, I run the container in background, enable tty and interactive session, naming it to ‘Bala7a0.0_container’, and using two new options -v for mounting “/home/msemari/mount” directory on my host to “/home/deployer/current” directory inside the container, and -p for mapping port “90” on my host to port “3000” inside the container.
# docker run -d -it -v /home/msemari/mount:/home/deployer/current -p 90:3000 --name Bala7a0.0_container msemari/chroma-development:1.0
f347b9bc9c8a921ed08b7df371fd9e644ca2cef4c78090334f171bb9887cc75c
See, we successfully created a staging/production container “Bala7a0.0_container” with some advanced options -v and -p
Before moving to the important part of this article, pay attention to the following hints:
Hints: 1. All the containers created will remain on the host filesystem until you choose to delete them by using the "docker rm"command. 2. You only use docker run once when you create a container, any further work on a container you will use the container commands, explained in the next part. 3. Creating a container with -v option to mount host directory inside a container will keep files on your host even if the container removed "kind of persistent storage". 4. ALWAYS USE OPTIONS-itWITHdocker runCOMMAND, FOR ME THIS MEANS MUST, AS THESE OPTIONS WILL FACILITATE YOUR WORK ON CONTAINERS.
Finally, it’s worth to check our Docker series “Get Started with Docker – Part 1 : Docker Hub, Pulling Images, and Basic Containers Manipulation” as it contains valuable info about Docker environment.
I hope this article is helpful for you.

If You Appreciate What We Do Here On Mimastech, You Should Consider:
- Stay Connected to: Facebook | Twitter | Google+
- Support us via PayPal Donation
- Subscribe to our email newsletters.
- Tell other sysadmins / friends about Us - Share and Like our posts and services
We are thankful for your never ending support.


Docker-box was Sponsored by micropyramid. By Using docker-box you can run full blown OS as containers. Not only OS you can run your Application as containers. For more details You can visit https://github.com/MicroPyramid/docker-box