Install openvpn server on Debian 9 “Stretch” Linux systems

Step 4: Traffic Routing
Now, we need to enable the IP forwarding on our openvpn server.
To enable IP forwarding in sysctl. Use the below command:
# echo "net.ipv4.ip_forward = 1" >> /etc/sysctl.conf
Now we need load this modification either you reboot your server “not preferred step” or run the below command to have the same effect of rebooting the server:
# sysctl -p
At this point we are ready to enable firewall rules on our openvpn server.
Step 5: Securing the Server
Securing your server against different types of attacks is one of the most important tasks systems engineer must master, we will discuss this topic in details in another article,but now will will secure our openvpn server using iptables rules.
If you did not enable iptables on your server, YOU CAN SKIP THIS STEP AND GO DIRECTLY TO THE NEXT STEP “STARTING OPENVPN”
THIS STEP IS OPTIONAL, BUT IT’S VERY IMPORTANT, let’s play with some iptables rules:
We need to add three rules to iptables. Open port 1194 with protocol upd, and add a postrouting NAT Rule run the following commands:
# iptables -A INPUT -i tun0 -j ACCEPT
# iptables -A INPUT -p udp -m state --state NEW -m udp --dport 1194 -j ACCEPT
# iptables -t nat -A POSTROUTING -s 10.8.0.0/24 -o eth0 -j MASQUERADE
Next, we need to save these two rules for permanent use, to do this on Debian Linux Family we need to install a package with the name “iptables-persistent” which takes over the automatic loading of the saved iptables rules. To do this run the following command, and accept all OK by pressing ENTER key:
# apt-get -y install iptables-persistent
Now, Those two rules will load automatically each time the system reboot.
Hint: If you added any new rules, and need to load it permanent, RUN THE FOLLOWING COMMAND AFTER ADDING THE RULES, and accept all OK by pressing ENTER key:
# netfilter-persistent save
At this Point securing your Debian Linux Family “Debian 8 “jessie”/Ubuntu 14.04, and higher” is completed, Again this section is optional.
Now, we are ready to start the openvpn server.
Step 6: Starting the OpenVPN server
Now, let’s go and enable then start the openVPN service. Run the following commands:
# systemctl enable openvpn
# systemctl start openvpn
Let’s check that the service is already running, to do this we need to do three checks:
Check 1: SERVICE CHECK
This check shows to us if there are any configurations error in /etc/openvpn/server.conf configuration file, run the below command:
# systemctl status openvpn
This command output should be something like the below image
 This image shows that the openvpn service is up, enabled, and running.
Check 2: NETSTAT CHECK
The above check ” service check” is not enough, we need to do another important check to make sure that the service is running, we need to run the next command:
# netstat -nlup
You will find port 1194 assigned to openvpn, as the below image
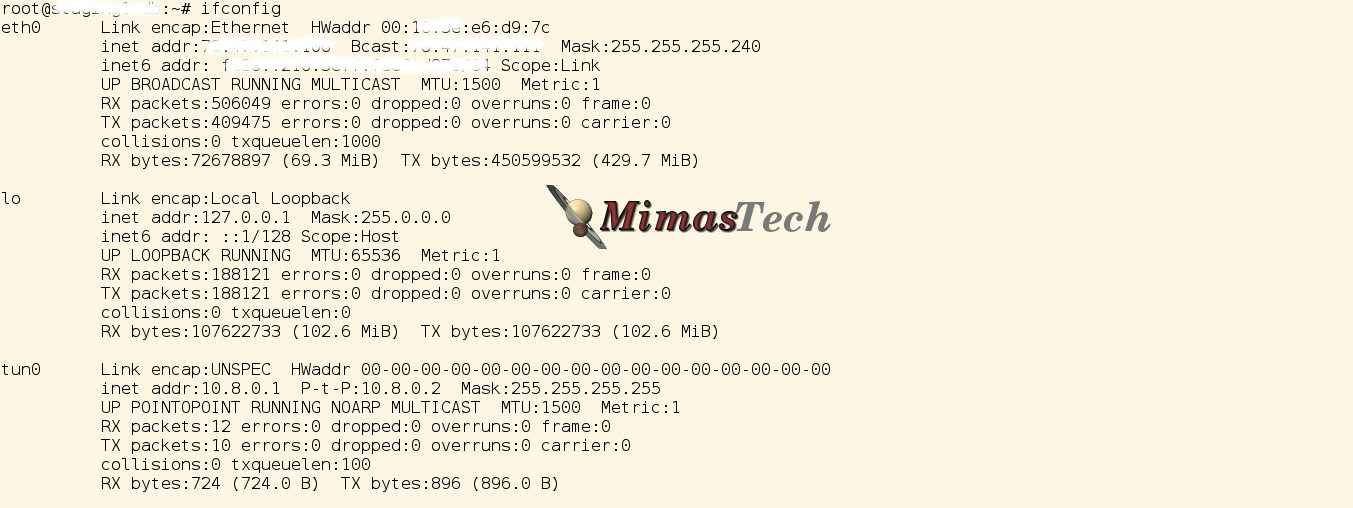
 Check 3: IFCONFIG CHECK
The above two checks show that we successfully configured the openvpn service, but we need to do another check ” optional check ” to see the installed NIC interface that openvpn uses, we need to run the next check.
# ifconfig
You will find a new installed NIC interface with name “tun0” and configured to use this IP address “10.8.0.1” as the below image
 At this point the server is running and well configured.
Notes:
 1. Why should I run at least two checks to check that the openvpn service is running?
 Here's the answer:
 This because that the first check is only check on the configuration file, and it succeeded with me, but when I tried to connect to the server I couldn't, so I run the other two checks, and discovered the the service is already running, and well-configured, but netstat check didn't show that the openvpn service use port 1194, also ifconfig check didn't show any installed new NIC "tun0".
 I tried to figure out what is missing, sure there is nothing missing in the openvpn configuration file, so I searched deeply for the cause of this error, and discovered the reason.

THERE IS A MISSING KERNEL MODULE I MUST INSTALL, I MUST INSTALL THIS KERNEL MODULE "tun" IT USED BY THE OS TO CREATE THE NIC INTERFACE USED BY OPENVPN, IF THIS MODULE IS MISSING THE SERVER WILL NOT COMPLAIN ABOUT ANY ISSUE IN THE CONFIGURATION. SO IN CASE OF CHECKS TWO AND THREE ARE NOT SUCCESSFUL YOU MUST GO AND CHECK ON THE EXISTENCE OF "tun kernel module" BY RUNNING THE BELOW COMMAND"

# lsmod |grep tun

This command shows the existence of this important module, if the above command didn't give any output then you are facing the same issue I faced before, then go and install this kernel module by running the following command:

# modprobe tun

Now we installed the missing module, we need to reboot our machine to test the success of the whole configuration, run the below command to reboot your system:

# reboot

When the system is up again , rerun the three check. they must give a positive outputs.
So we have successfully completed all the server-side configuration for OpenVPN. You need now to configure the clients machines to connect to the openvpn server, go and check our article for setting up a client connection to openvpn server using a different OSes “Windows, Linux, and Mac”.
Summary
In this article we have explained the installation, and configuration of the OpenVPN server, we completed our set-up in six steps, one of them is optional, but most important for a good Systems Engineer “Step 5: Securing the Server”. We also included the solution of an issue that faced us while testing the set-up of the openvpn server. Now you can safely protect you important services from being publicly accessible through the internet.
I hope this article is good enough for you.
See you in other articles.

If You Appreciate What We Do Here On Mimastech, You Should Consider:
- Stay Connected to: Facebook | Twitter | Google+
- Support us via PayPal Donation
- Subscribe to our email newsletters.
- Tell other sysadmins / friends about Us - Share and Like our posts and services
We are thankful for your never ending support.


Hi Mohammed. Thanks for the article. However I’m getting stuck on:
root@raspberrypi:/etc/openvpn/rsa# ./build-ca
pkitool: KEY_CONFIG (set by the ./vars script) is pointing to the wrong
version of openssl.cnf: /etc/openvpn/rsa/openssl.cnf
The correct version should have a comment that says: easy-rsa version 2.x
When I open the file /etc/openvpn/rsa/openssl.cnf, at the top there is the comment: # For use with Easy-RSA 3.0 and OpenSSL 1.0.*
Do you have a clean solution for me?
Hi Anton,
This issue because easy-rsa didn’t find openssl.cnf in this path /etc/openvpn/rsa
When we list the files in this path, we found
# ls /etc/openvpn/rsa
total 116
-rwxr-xr-x 1 root root 119 Sep 7 11:09 build-ca
-rwxr-xr-x 1 root root 352 Sep 7 11:09 build-dh
-rwxr-xr-x 1 root root 188 Sep 7 11:09 build-inter
-rwxr-xr-x 1 root root 163 Sep 7 11:09 build-key
-rwxr-xr-x 1 root root 157 Sep 7 11:09 build-key-pass
-rwxr-xr-x 1 root root 249 Sep 7 11:09 build-key-pkcs12
-rwxr-xr-x 1 root root 268 Sep 7 11:09 build-key-server
-rwxr-xr-x 1 root root 213 Sep 7 11:09 build-req
-rwxr-xr-x 1 root root 158 Sep 7 11:09 build-req-pass
-rwxr-xr-x 1 root root 449 Sep 7 11:09 clean-all
-rwxr-xr-x 1 root root 1471 Sep 7 11:09 inherit-inter
drwx—— 2 root root 4096 Dec 18 15:13 keys
-rwxr-xr-x 1 root root 302 Sep 7 11:09 list-crl
-rw-r–r– 1 root root 7859 Sep 7 11:09 openssl-0.9.6.cnf
-rw-r–r– 1 root root 8416 Sep 7 11:09 openssl-0.9.8.cnf
-rw-r–r– 1 root root 8313 Sep 7 11:09 openssl-1.0.0.cnf
-rwxr-xr-x 1 root root 13246 Sep 7 11:09 pkitool
-rwxr-xr-x 1 root root 1035 Sep 7 11:09 revoke-full
-rwxr-xr-x 1 root root 178 Sep 7 11:09 sign-req
-rw-r–r– 1 root root 2077 Sep 7 11:16 vars
-rwxr-xr-x 1 root root 740 Sep 7 11:09 whichopensslcnf
As you see, no openssl.cnf file exists.
Solution is very simple, we make a symbolic link of the latest openssl.cnf file we find, here the latest on is openssl-1.0.0.cnf
Run this commands:
# cd /etc/openvpn/rsa/
# ln -s openssl-1.0.0.cnf openssl.cnf
Now, the issue is solved, re-run your commands again.
Finally, I list the files again for checking
# ls -l /etc/openvpn/rsa
total 116
-rwxr-xr-x 1 root root 119 Sep 7 11:09 build-ca
-rwxr-xr-x 1 root root 352 Sep 7 11:09 build-dh
-rwxr-xr-x 1 root root 188 Sep 7 11:09 build-inter
-rwxr-xr-x 1 root root 163 Sep 7 11:09 build-key
-rwxr-xr-x 1 root root 157 Sep 7 11:09 build-key-pass
-rwxr-xr-x 1 root root 249 Sep 7 11:09 build-key-pkcs12
-rwxr-xr-x 1 root root 268 Sep 7 11:09 build-key-server
-rwxr-xr-x 1 root root 213 Sep 7 11:09 build-req
-rwxr-xr-x 1 root root 158 Sep 7 11:09 build-req-pass
-rwxr-xr-x 1 root root 449 Sep 7 11:09 clean-all
-rwxr-xr-x 1 root root 1471 Sep 7 11:09 inherit-inter
drwx—— 2 root root 4096 Dec 18 15:13 keys
-rwxr-xr-x 1 root root 302 Sep 7 11:09 list-crl
-rw-r–r– 1 root root 7859 Sep 7 11:09 openssl-0.9.6.cnf
-rw-r–r– 1 root root 8416 Sep 7 11:09 openssl-0.9.8.cnf
-rw-r–r– 1 root root 8313 Sep 7 11:09 openssl-1.0.0.cnf
lrwxrwxrwx 1 root root 17 Dec 18 15:01 openssl.cnf -> openssl-1.0.0.cnf
-rwxr-xr-x 1 root root 13246 Sep 7 11:09 pkitool
-rwxr-xr-x 1 root root 1035 Sep 7 11:09 revoke-full
-rwxr-xr-x 1 root root 178 Sep 7 11:09 sign-req
-rw-r–r– 1 root root 2077 Sep 7 11:16 vars
-rwxr-xr-x 1 root root 740 Sep 7 11:09 whichopensslcnf
Regards
Hello and thank you for this tutorial.
But, when I start the openvpn server, I have a problem with the ta.key.
Should not it also be generated with:
#openvpn –genkey –secret keys / ta.key?
Because without this ta.key, impossible to start the openvpn server.
Sorry for my English, I’m a French speaker 🙂